Friday, December 27, 2013

Screen Printing

I am taking graphic arts classes at Laney College, and it has been keeping me busy. This semester I took anIntro to Design, Typography, and InDesign. I’ve put some of my work from this year up on lindacline.synthasite.com. Some older classwork from photoshop and illustrator classes is there as well.

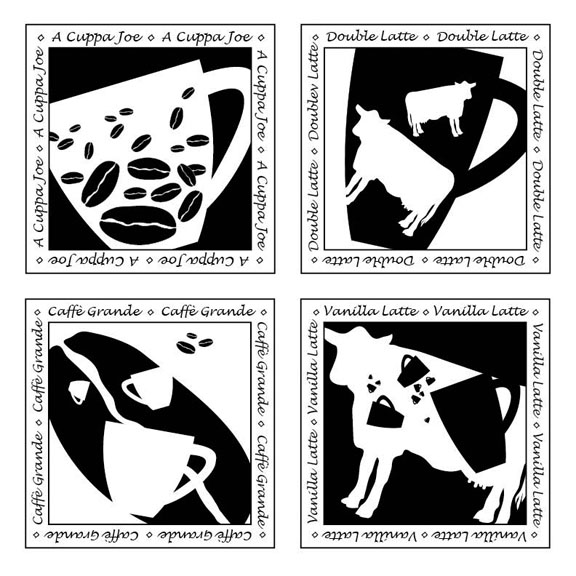
An assignment in positive/negative space left me with several designs which looked like coasters. I decided I should make coasters for Christmas presents, and the best way I could think to transfer the design was silk screen. This was a learning experience.


My first challenge was finding a clamp on shop lamp with a high enough rating to take a 150 watt bulb. Then I had to order the correct bulb in order to follow my exposure instructions.

Next I questioned the exposure time in the Speedball instructions. 15 inches high for only 7 minutes if I have a shop reflector, but 12 inches high for 45 minutes if I use a pie pan reflector. A service rep at Speedball said that shop reflectors can vary greatly, and I should do a test before I do my expose my final screen. This website gave helpful instructions for testing exposure times. Rather than going out to photocopy onto a transparency, I used an old transparency with a small amount of typing on it, and painted numbers with acrylic paint. To make sure my paper for covering up numbers every five minutes was opaque enough, I glued aluminum foil to the back of some scratch paper. I ended up with 15 inches high for 85 minutes, and have decided the 7 minutes in the instructions has to be a typo.

Coating the screen evenly seemed impossible. I have an older screen, and don’t know if it is silk or polyester. It seems to stretch slightly when it gets wet, which made my squeegee only able to touch the screen near the edges after I had emulsion on the front. I ended up trying to smooth out the emulsion and make it smooth with a paintbrush.

After exposing it, the places where the emulsion was thicker didn’t want to rinse out, so my prints ended up somewhat spotty. I also learned that the glass holding down the transparency should cover the whole design. I thought the being a quarter inch short on the sides wouldn’t matter, but it left a line where the edge of the glass was. The courser light fabric in this photo is my drapes, and not part of the screen.

Making the prints was a simple process in comparison to developing the screen, and went rather quickly. I made some coasters for Christmas presents out of some, and have given them out without photos. I am making a couple of more sets and will show them in another post.

Saturday, February 2, 2013

2012 Whisper Quilts Revealed

The Whisper Challenge for our Northern California/Nevada SAQA group had their big reveal meeting of the finished quilts today. It’s always fun to see the directions the various participants went in. You can see all of the quilts on our regions blog.

Here is the starting photo (By Deb Cashatt) that was used for our latest SAQA Whisper Challenge. It shows a busy street corner in Hong Kong. The arched structure is a pedestrian walkway above the street.


I wasn’t sure I would like doing an architectural piece, but I ended up liking how it turned out. With so much going on in the quilt, I needed to decide which details I would focus on and which I would edit out. I ended up piecing together of vertical rectangles to suggest a city, and then I painted the arches on top.

See what others have been up to this week on Nina Marie's Off the Wall Friday

Saturday, January 26, 2013

Hibiscus Quilt

Here is the quilt I started back in November. This was a fun experiment to start with a couple of tiny scraps and build a quilt around them. I used free motion quilting to extend the design of the small bits of commercial fabric. Today I painted (mostly in the background.)

To make the painting relate to the piecing, I added some geometric shapes while I was painting. This discovered while I was working on my Whisper Quilt this summer.

I like parts of this quilt close-up better than I like it as a whole, but it was worth doing just to enjoy the process.


The SAQA Whisper Quilt challenge will be revealed at our regional meeting next Saturday in Elk Grove. I will post about it in a couple of weeks.

See what others have been up to this week on Nina Marie's Off the Wall Friday.

Wednesday, January 23, 2013

Roll-up Brush Holder


My plastic art bin for carrying painting supplies is just a little too small for some of my longer brushes. I spent part of the afternoon today picking out some fabrics to make a roll-up brush holder that I can toss into a tote bag.

I’m ready for my acrylic painting class tomorrow.

Thursday, January 17, 2013

My Quilt Rescue Continues

Steps I have taken so far to rescue this quilt:

  1. Attempt to fix color and contrast problems them with fabric markers and paint
  2. Fixed some problems but also created more problems because of my timid approach
  3. Procrastinated for several days while I decided to continue working on this project or abandon it all together
  4. Decided it’s better to risk ruining the whole thing than putting it back in the drawer for another several years
  5. Abandoned all caution, and attacked with paint in bolder colors

This still isn’t my favorite piece, but I am encouraged by the direction this is going. I will continue with it this week. I think I will add more color to the still black and white fabrics before I start quilting.

Thursday, January 10, 2013

A New Background for an Old Work in Progress

I’m trying to finish up some older things to make room for some new project ideas.

I have replaced most of the background fabrics in this piece which I started in 2006 and got out again last week. I am starting to like this piece up close, but I can see it needs some work with more contrast when I stand back from it. I need to decide if I will add paint or change some of the fabrics to make the composition more successful.

I have it up on my design wall now next to this piece, and noticed it had many similarities to this quilt I did in 2011. It seems I have a series going quite by accident.

Nina Marie has chosen the word Productivity for 2013. She has been finishing projects as well. Things I plan to do for 2013 so I can make Productivity my word also:

  1. Finish this quilt (any ideas for a title?)
  2. Finish up the quilt made with “starter scraps” (began in November)
  3. Make Camilla a skirt (from fabric purchased several months ago)
  4. Make canvas shopping bags (got fabric last week)
  5. Complete several acrylic paintings for a class I am starting in a week and a half
  6. Get started with the new quilting ideas which are in my mind still

I saw a preview of “The Watercolor Show” as it was going up in at the Cinema Place Gallery in Hayward this week. It looks like it will be a fabulous show.

Friday, January 4, 2013

Two More Watercolors & Some Quilted Portraits


Three watercolor paintings I did earlier this year will be an exhibit at the Cinema Place Gallery in Hayward:

The Watercolor Show 
Jan. 10- Feb. 23, 2013 
Reception Fri., Jan. 11, 5-7pm

Here are a couple more watercolors I did for my class.

The technique for the first painting was to emulate the texture that Andrew Wyeth used in his paintings. This lantern and the foreground rocks have texture added to them from stippled paint, sanding, and lots of drybrush. This is my husband’s favorite so far this year. I like how most of the painting turned out, but wish the water hadn’t gotten so muddy looking, and I’m not sure about the brown rocks.

The second painting we were to use Turner’s technique of picking paint up after putting it onto the paper to lighten areas. This is a view of Lake Chabot in Castro Valley from an overlooking trail on Fairmont Ridge.

I found a couple of unfinished quilted works I started seven years ago.

 The face on the first is from two pieces of fabric. The face is drawn on with a Pigma ink pen. The shapes and lines are all traced from a photo of Camilla when she was about six years old, but somehow it didn’t end up looking like her very much at all. The part I like best is stalk of succulent flowers I added almost as an afterthought because the bottom seemed to plain, but they never quite seemed to fit with the rest of the image. This one is nearly done except the edges are unfinished. I expect it will stay this way unless I decide to cut it up and use the flowers from it on something else sometime.

I decided to use the same photo as a starting point for a second try. This time I cut all the shapes freehand and went wild with the colors. Maybe too wild. It got put in a drawer at this point and it was forgotten until I dragged it out a week ago. Camilla likes this one, so I decided to see what I could do with it. I’ve added some more fabrics around her since this photo. I’ll post more photos when I see where it takes me.