Wednesday, January 30, 2008

Week 2 Continues & Painting Embroidery Floss

My landscape is halfway stitched. Some of my fabrics are a bit tightly woven, making it hard to needle through especially where they are doubled.

I didn't find a shade of floss I was looking for at home (maybe I'm just to picky, but I made up my mind what I wanted). I like variegated floss, but hate how most commercial variegated threads go from bright saturated colors to almost white.

My solution was to paint some of my lighter colored floss with Setacolor paints diluted a bit with water Wind in a loose skein, dab the color on (a bit darker at one end of the skein), blow dry, heat set with the iron. Now I have "hand dyed" floss which was ready to use in about 20 minutes. I suppose you might call me color obsessed.

Monday, January 28, 2008

Online Class – Week 2

I spent two days in Capitola this weekend at a retreat with my CQFA group. It was an enjoyable weekend away, and a chance to get to know the other in the group better.

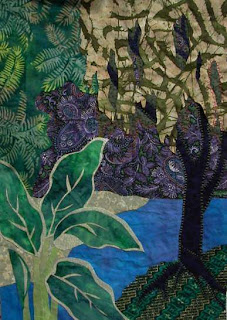
I packed a small bit of my blues and greens which fit in the large suitcase (it’s hard to pack fabric when you don’t know what exactly will be made), so I could work on lesson 2 in my online class with Pamela Allen. The assignment this week is to do a quilt in a limited color palette (either complementary or analogous). This is the landscape that resulted.

I was attempting to put a plant in the foreground, but wasn’t sure what it would look like. I sketched some leaves from the silk plants at a restaurant that evening, and came back after dinner to make the leaves.

I have begun stitching on the tree.

It's a bit intimidating to begin a quilt without any idea where I might take it, although the hesitation mostly disappears after I have a few fabrics down. I've been enjoying doing the lessons and learning a lot from both the doing and seeing what others are doing.

Pamela commented about landscape being usually oriented in a horizontal format. I didn't think about this landscape being vertical. I seem to have a strong preference for vertical formats, and have made the conscious decision to make vertical landscapes in the past. I think maybe if I had made the same thing horizontally, it would give more importance to the land and the water and give less important to the tree. Which gave me a "what if" thought:

It’s fun to play with things on the computer sometimes to try out ideas.

Wednesday, January 23, 2008

Progress on the Black & White Still Life

I made some small changes based on comments I received from Pamela and others and have begun the stitching on my quilt.

The stitching is taking more time than I usually like to spend on handwork, but I love the texture that it is adding. I tried to make a join in the white fabric inconspicuous with regular sewing thread, but instead switched to off-white embroidery floss and a herringbone stitch. It seemed to be making a little landscape out the window, so I added another more horizontal line of herringbone just above the join for a horizon.

The idea of a windmill (another wind machine to go with the wind chimes) near the horizon keeps nagging me. It would need to be small in subtle colors to be out near the horizon and not distract from the rest of the quilt.

Monday, January 21, 2008

Class with Pamela - Black & White Still Life

I am taking an online class with Pamela Allen. We will be having 4 lessons over the next 4 weeks. For Lesson 1 we are supposed to create a still life using black and white fabrics. Here it is in progress. Looking at it now, I think I need to fix the angle on the seat of the left chair, and angle the verticals on the right chair so they point toward the center. And I have moved the left cup up, so it isn't in such a straight line with the glass and chair.

Pamela and others have made some suggestions which I am considering, and then I will sew it together today or tomorrow.

Saturday, January 12, 2008

Two Quilt Guilds

I belong to the Piecemakers Quilt Guild in Newark. This guild has a couple hundred members, monthly meeting, and often has featured speakers. They guild also has a wonderfulCommunity Quilts program. Kits are made up and given to members to make quilt blocks. When the blocks are returned at the meeting, they are grouped together with fabric for sashing and borders for a new kit. Completed tops are put together with backing, batting, and binding. Some are taken to be machine quilted by individuals. Others are tied at guild sponsored tie-ins. The quilts are donated to local non-profit and service organizations who distribute the quilts and put them to good use. I will be a featured artist and speaker at the Piecemakers Quilt Show in May.

I brought a kit home containing completed blocks and fabric to make sashing and borders with instructions to complete the top. I decided to put the blocks together “wrong”. While I was deciding which way to orient the blocks, I noticed some of the blocks were “wrong” also. My way of putting it together disguises the “wrong” blocks, and the quilt is more interesting than if had been put together “right”. I wonder if there will be traditional quilters who look at it and think, “What was she thinking?” I added the small yellow squares between the sashing and the large blue corner squares, just because. I hope this quilt will make someone smile.

I spent this morning in Santa Clara at CQFA which is my other quilt guild. It meets every other month, and is geared more towards art quilting and anyone interested in more innovative techniques. We’re a smaller group, and less structured. But it’s worth going just for show and tell and see what everyone else has been up to. We usually have a small informal workshop presented by one of our members, and occasionally have a guest speaker. Today one of our members, Debbie Wambaugh, shared a technique she calls “blooming chenille”. Examples of her work can be seen here:
http://www.mountainartcenter.org/Shows/fibers_of_america.htm
http://www.mountainartcenter.org/Shows/form_and_function2005.htm
Debbie has a great color sense, and her pieces are full of wonderful texture.

I am lucky to be spending two days at a retreat with some of the CQFA members at the end of the month. We don’t have any planned projects, just time away to work on projects and a chance to get to know each other better.

Thursday, January 3, 2008

Tutorial for Binding with an Accent Strip


I did a quilt for the Fast Friday challenge back in June. The challenge was to use one thing on your quilt that is NOT from a fabric store, with a spending limit of five dollars. I bought a couple dollars of fiberglass screening from the hardware store, and used it to represent cross-hatching. Here is the original challenge posting.

When I finished my challenge, I was still deciding how to finish the edges, and had decided it needed a bit more quilting. I added some quilting the background, and decided I would finish the edges with an accent strip between the binding and the quilt to define the edge better. After a couple of practice attempts at binding with an accent strip, I figured out how to finish the edge to get the look I wanted.

I cut binding strips two inches wide and contrasting strips ¾ inch wide, and ironed both in half lengthwise.

Thread the machine with a color which matches the contrasting strip. Load the bobbin with a color that contrasts with the backing fabric (I used white to blend with the binding).

Line up the raw edges of the contrasting strip with one of the quilt edges, and sew with a scant quarter inch seam. Repeat on the opposite side. Trim the ends flush with the edge of the quilt. Do the same thing on the remaining sides, letting the ends overlap the first two strips.

Line up the raw edges of the binding strip with one of the quilt edges, on top of the contrasting strip, and pin in place. Sew from the back using the stitching from the last step as a guide. Stay just on top or a thread or two closer to the center of the quilt. Trim the ends flush with the edge of the quilt. Fold to the back and blind stitch to the backing. Repeat on the opposite side.

Sew the last two binding strips on in the same manner but leave about ¾ inch hanging over the ends. Trim the raw edges that extend past the edges of the quilt at an angle to make less bulk when you turn them to the back. Blind stitch.

Coffee Cup Sketch (14 x 9½)