Saturday, November 17, 2012

Watercolor Portrait Completed


When Camilla was two, we were vacationing in Colorado. This watercolor was done from a photo taken on that trip.

The technique for this assignment was glazing, meaning many layers of very watered down transparent layers laid one on top of another to build up the color. I like the results, but didn’t enjoy the process, so this will probably be the last painting I do entirely in glazing. I have used glazing in a limited amount in other paintings where I need to change or darken a color. It also worked nicely to get soft color changes in the face.


Here is a detail of the in progress quilt started last week.

Monday, November 12, 2012

Notan, Gallery Exhibits, & Scrap Starters

Last weekend at CQFA, we did a mini workshop on considering the Japanese concept of Notan in our designs. Here are my workshop results completed with free hand cut paper and glue.

I gallery sat at the Cinema Place Gallery in Hayward for their Abstract Exhibit. It is a nice selection of both two and three-dimensional work. There are three other quilters plus painters and sculptors in the exhibit. Chabot College also has an exhibit there this month. The work in the Chabot exhibit is mostly representational, and is an impressive display of drawings, paintings, and sculpture.

Wanting a small project I could do in between my current watercolors, I thought I would try completing a small quilt started with small scraps. I saw this idea on Franki Kohler’s blog. Franki was inspired by an article by Jenny Bowker in Machine Quilting Unlimited (May 2011.) Here is my start. The idea is to use the small scrap as in inspiration for the quilting design, and then to expand the design into the plain areas of the quilt with free-motion quilting. I am already thinking about how I might add paint to parts of the quilt.

Tuesday, October 23, 2012

Completed Teapots

More color has been added to the teapot shadow painting.

I was thinking about keeping the background rather plain. But my instructor liked the pattern on the cutting mat that was sitting behind the still life in the reference photo. Square tiles seemed boring. So I considered what kind of pattern I might quilt if I were designing a quilt, then invented a wallpaper pattern.

The foreground seemed week after I painted the back, so I added a wood grain tabletop.

Friday, October 19, 2012

Upcoming Shows

My work will be in two upcoming shows.

The San Jose Museum of Quilts & Textiles will hold its 5th Annual High Fiber Exhibit October 20 – November 4, 2012. All of the art in this exhibition is for sale at $500 or less, with a designated percentage of the proceeds donated to the Museum. Four of my quilts along with many other quilted and fiber works were selected for this exhibit.

The Cinema Place Gallery in Hayward will be showing Driven to Abstraction November 1 – November 25 2012. All of the work in this show will be abstract work. Two of my quilted wall pieces, plus my quilted rock, will be in the show. Mine may be the only textile work in the show. I expect to see a lot of paintings and mixed media work.

Wednesday, October 17, 2012

Shadow Shapes

My instructor liked the second Echeveria painting that I brought to class last week. His only suggestion was to darken the lower right corner a little more to keep the eye from wandering off the bottom of the painting.

The first Echeveria turned into my gesso experiment. The experiment wasn’t very successful in its outcome, but now I know how watercolor will combine with gesso. It is difficult to get even washes or dark colors. It might be useful to add texture to part of a painting, especially in a collage. It doesn’t seem to be a good technique for covering large areas intended for watercolor.

I picked a photo I took of teapots a few years ago for the next watercolor assignment. I chose it for the shadows, because for this assignment we are supposed to paint the shadows first, and then lay the color of the objects on top of the shadow painting.

I thought I was done with the shadow painting, but looking at it now on the computer, I see several areas I need to make darker. I can also see now that the pots have changed shape somewhat from the original. Oh well, they still look like pots.

I’m a bit worried about getting muddy looking colors when I lay down the yellow on the front pot. I should do a test to see if I want to change its color before I paint it.

Wednesday, October 3, 2012

A second Echeveria

Here is the second attempt at painting this Echeveria. I don’t know if this is looser than the original painting, but I have managed to float more color into the washes.

I’ve been thinking about trying to combine watercolor with quilted fabric, and bought some gesso yesterday with that thought in mind.

Having two paintings that meet the requirements for the current assignment, I thought I might add gesso to parts of the original painting, and give myself permission to play. Now where is the gesso? I have misplaced it somewhere since yesterday afternoon. I have looked through the house. Perhaps it fell out of the bag in the car? Or perhaps it never got put in the bag at the store? I will likely find it the minute I give up on finding it, and go buy a second jar.

Wednesday, September 26, 2012

Echeveria Watercolor

My second succulent is complete. I fussed with the colors and values so much trying to get it just so. It turned out reasonably like the photo, but the finished painting seams overworked to me.


I admire watercolors with looser strokes and broad washes, and so I decided to try the same composition again.

I had trouble in the first painting with a large orange area that seemed out of place. I spent a fair amount of time trying to tone it down, and fit in other smaller orange tinted areas. So I started with yellow this time, so I could distribute it early on. The yellow seems a little prominent right now. I think it will become a little less noticeable after I go back in with darker pinks and purples.

Saturday, September 8, 2012

Self Portrait Workshop

Caroline Ogg and Bron McInerney led a mini Self Portrait workshop at our CQFA meeting this morning. There was a lot of nice work this morning. I just took a few photos.

This is a sample Caroline did in a previous class. Can you tell she adores cats? I especially like her creative use of fabric for the eyes on her portrait.


Bron did a portrait of her friend. She traced the major shapes from a previously done watercolor, and used the tracing as templates to cut the fabric pieces. The necklace is bits of shell on a string.


Julie’s portrait is all in blues and greens. The fabric outlining her eyes is peacock feathers, and the white of her eyes are clouds.


I was afraid to start cutting directly into my fabric, so I spent the time sketching from a photo. My plan was to trace pattern pieces following the outline of the shaded area. It was good to get some drawing practice in, but I think I may start over by tracing over the actual photo to get a more accurate image.

Friday, September 7, 2012

Completed Watercolor

The first of my completed paintings for a watercolor class at the community college:


This is an Aeonium hathorii. The assignment was to complete a painting using isolated wet washes in each shape. I have a second succulent close-up picked out for a second painting done with a different technique.

Friday, August 17, 2012

Quilted Rock #1


Quilted Rock #1 (3.5 h x 2.75 d x 2 h) is done.

I have several quilts in my mind, but it is good to have something small and less complicated in progress with so much else going on right now. Rock number two has been selected. The yard is making progress, but not done yet. I start teaching an online typing class on Monday. And I will be taking another watercolor class.

Thursday, August 16, 2012

Fitting the Quilted Work Around the Rock

The piece I created somehow wasn’t the same shape as my paper pattern when I was done stitching the edges. There was a lot of pleat adjusting and sewing in extra pieces.

I’ve done all the machine work I can do on this. I will need to complete the stitching by hand. Then wrap it in a damp cloth and steam it well with an iron to help the quilted shell conform to the correct shape.

Monday, August 13, 2012

Stitching on Water Soluble Stabilizer

I went shopping a few days ago for Sulky Solvy, since it’s the only water soluble stabilizer I am familiar with.

I came home with Pellon Wash-N-Gone. It feels and looks like a medium weight non-woven interfacing, and less like a piece of plastic wrap. I thought that because it had a little more body I wouldn’t need a hoop to work with it. The quilted fabric is stiff enough to hold its shape, but the stabilizer is puckering badly. If I was trying to create an exactly sized piece, this would be a problem, The edges of these pieces don’t need to be exact, so I think it will work for me.

The hard part is going to be figuring out how this goes back on the rock after I have finished stitching and rinsing it. And I must remember to mark the leftover stabilizer well, so I don’t use it to interface a shirt collar sometime.

Saturday, August 11, 2012

Quilted Rocks

What do rocks have to do with textile art? Not much, except it’s been in the back of my mind for a year or two that I should cover a rock in quilted fabric. Having plenty of leftover rocks from our landscaping project left me with no excuses.

I’m not exactly sure how this will all come together yet, only a rough plan. I don’t intend to cover the rock completely, but will leave holes so the rock can be seen. The edges of the quilted section will be finished with free motion threadwork done on wash away stabilizer.

I had attempted to construct a pattern by covering the rock with tissue paper and then again with masking tape, cutting it off with a knife, then adding darts with scissors until it laid flat. This worked a bit. I think the multitude of darts I had would just look messy and confusing.The tape was more difficult to cut than I thought it would be, and the edges were a little jagged. I will try again with a sheet of paper, scissors, and maybe some double sided tape.

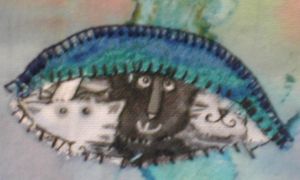
I picked a fabric color which would look nice against this rocks dull yellow-gray color. Since the colors reminded me of sand and water, I quilted a small piece of the cloth with motifs which made me think of water and rocky shores and then painted it to add a little dimension and highlight the texture. I kind of like this as is, but will continue with my plan to cut it up once I figure out the shapes I need.

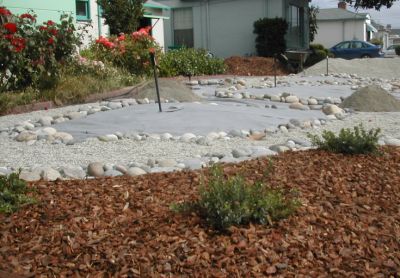
 Out in the front yard, Doug has laid the edging board for a brick walkway next to our very narrow driveway. Camilla and I leveled sand and laid bricks the last couple of days. This will give us room to get out of the car without stepping on plants or gravel, and provide a walkway to the backyard.

Saturday, August 4, 2012

Getting a Little Bit Greener


This is what our yard looked like at the beginning of June before we had the lawn removed.

Today was spent laying out edger board along the right side of the driveway for a walkway next to the car. It was perfect weather for working. It stayed overcast most of the day. We got about ten minutes of sunshine and about two minutes of very light rain. We have lucked out this summer, and haven’t had any very hot days.

Yesterday we planted some low growing Manzanita plants. This “Emerald Carpet” variety only stays less than a foot tall, but will spread up to six feet. Camilla spread bark around the plants today.

We have just a small edge of the garden planted. We will be very busy the rest of the summer, and maybe fall too.

Wednesday, August 1, 2012

Working a Little Larger


The current project is a little larger than the quilts I’ve been making. We had the front lawn removed a month and a half ago, and it’s finally starting to look like more than a dirt pile. All three of us have been busy working on it.

I claimed laying the landscape fabric as my job. The fabric we got is very similar to a stiff Pellon non-woven interfacing. I spent most of yesterday interfacing the entire area while Doug hauled wheelbarrows about and Camilla started arranging rocks to separate the gravel areas from the planting areas. We both played with rocks some after all of the cloth was laid.

The pile of sand will get spread as a base for a stepping stone walkway.

Several yards of gravel and redwood bark is getting delivered later today. We may take the day off from working, and go shopping for plants.

Thursday, July 5, 2012

Whisper Challenge


Have I really not posted since December? I was busy in Spring teaching an Excel class which I hadn't taught before. Went on a week and a half trip to Orlando and Disney World right after school let out. This summer I've been busy with a major garden project in the front yard. I did manage to get a quilt done last month, although I can't show more than a preview since it's a challenge project which can't be revealed yet.

It’s Whisper Challenge time again. Here is a small detail of how I began. The top is pieced together with overlapping edges held together with zigzag stitching. I drew the main design lines directly on the top with a permanent fabric marker. They are hardly visible now after I have added all of the layers of paint and quilting. The completed quilt won’t be revealed until after the challenge is complete in February 2013.

The 2011Whisper Challenge can now be viewed on the SAQA regional blog. My quilt “Figs for a Crow” is the seventh quilt in Group 5.

I never showed the finished quilt from the 2010 Whisper Challenge, although I showed a preview a couple years ago. I don’t think there is a slide show available of the whole challenge, but I do have a few photos from the beginning.

Here is the photo, which I started from. A small crab on a rocky beach.


Here it is my finished quilt. I zoomed in on the little crab, brightened the color scheme up, and added a few barnacles.


I love what Deb Cashatt came up with next. She manipulated the photo of my quilt in Photoshop, and came up with something totally unique.