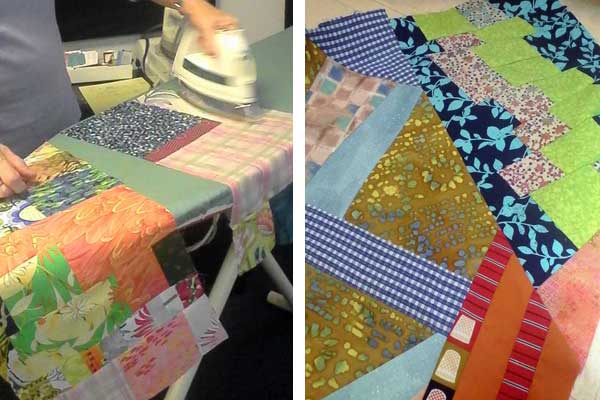
It's time to face the two quilts which are ready to be quilted and finished. This is my variation on a method which is sometimes called the "pillowcase method". I will show the finished quilts in a few days.
Layer the quilt top on top of the batting and do enough quilting to hold the batting in place. For this quilt, I am doing some raw-edge applique at the sames time.
If the finished size is important, mark lines for the finished size on the front of the quilt. Trim a little more than a quarter of an inch away from the edge. I don't use a ruler or a straight edge since I am pretty good at guessing seam allowances, and I prefer the organic edge I get from freehand cutting.
You may want to mark the top of your quilt before this step. Lay the top face down on the backing (right sides together and put a single pin in the center. Beginning in the middle of the sides, scoot the edge of quilt front and batting toward the center an eighth to a quarter inch then pin. Repeat for each side, then do the same for the corners. The idea is that you want the backing to be a bit smaller than the front so the seam on the edge will roll to the back. Test to see if the backing has enough stretch to ease stitch the edge together without creating any creases in the front. take out some fullness if necessary and add more pins if you like.
Stretch the backing as you sew all the way around the edge with a quarter inch seam allowance. Be careful to keep the batting even with the front edge as you sew.
Trim the backing fabric, and cut the corners to remove bulk when the quilt is turned.
Cut a strip of fusible web an about an inch wide and a few inches shorter than the width of the quilt. Fuse it where the sleeve will be sewn on later. Make sure you know which way is up, and fuse it near the top edge. Pull the backing away from the quilt front and cut a slit in in it to make an opening for turning.
I use a slightly blunt pencil as a turning tool. Place the tip of the pencil right at a point, and pull the backing fabric over the tip of the pencil. Repeat for each point. Then turn the whole quilt right side out. The pencil trick usually does a good job, but use a blunt needle to finish pulling out any points which don't look sharp enough.
Roll the seams to the inside while you press the edges. If you don't have paper on your fusible web, then avoid ironing over it until you have ironed the edge completely.
Everything should be looking pretty flat at this point. Remove the paper from the fusible web. Press the fabric above the slit to fuse it to the batting. Smooth out any wrinkles in the back and press the rest of the slit. If the edges of the slit don't line up perfect, it's not a problem since your hanging sleeve will be sewn over the top when you've finished quilting.
Showing posts with label work in progress. Show all posts
Monday, February 29, 2016
Wednesday, February 24, 2016
Auditioning Backgrounds
I cut the subject out from the background on this piece. The light colors were blending too much with the background fabric.
Spent too long on creating a new background before I decided the medium values are blending now. And the intricacy of the background is competing with the foreground.
I think I am like this simpler darker background much better.
See what everyone else is up to on Nina Marie's Off the Wall Friday
Spent too long on creating a new background before I decided the medium values are blending now. And the intricacy of the background is competing with the foreground.
See what everyone else is up to on Nina Marie's Off the Wall Friday
Saturday, February 13, 2016
The "Fruit Salad" saga continues
Still life chopped up into smaller pieces. I think I will keep the other piece I showed last week uncut, but add some similar style borders to make it look more finished.
Linking up to Nina Marie's Off the Wall Friday.
Saturday, February 6, 2016
Re-purposing Some Older Work
The San Jose Museum of Quilts & Textiles is asking for donations of 10 in squares fiber artwork to be sold to help with funding. The "Fiber Shot" sale will be held in conjunction with the Kaffe Fassett show beginning March 11th.
Thinking about what I could do to participate, I dug out some old design exercises which have been sitting in a box for 10 years. Two sets of identical shapes were cut freehand to make a still-life. The second set of shapes was re-arranged to create an abstract composition.
I've been uninspired to do anything with either of the pieces. The first still life was fun to make, but lacks any imagination and didn't hold my interest, so I made some sketches, and decided to cut it up and make "fruit salad". I cut it up before I could change my mind, so now I'm committed.
Thinking about what I could do to participate, I dug out some old design exercises which have been sitting in a box for 10 years. Two sets of identical shapes were cut freehand to make a still-life. The second set of shapes was re-arranged to create an abstract composition.
I've been uninspired to do anything with either of the pieces. The first still life was fun to make, but lacks any imagination and didn't hold my interest, so I made some sketches, and decided to cut it up and make "fruit salad". I cut it up before I could change my mind, so now I'm committed.
I plan to cut it into smaller irregular squares and mix it together with some greens and purples. The other piece may just get some borders added.
Monday, August 31, 2015
Improvisation - part 2
I took a second look at the "round robin" quilt I came home with from the cqfa meeting
a few weeks ago. There was a large green rectangle that was drawing too much
attention in the original, so I trimmed it down into smaller pieces and redistributed
them. Added some more of the blue print fabric, and continued the black
as a border. Need to decide how big I want it so I can finish the
piecing.
Labels:
CQFA,
group project,
Improvisation,
work in progress
Monday, August 3, 2015
Improvisation with Friends
Saturday was spent at a meeting & workshop for Contemporary Quilt & Fiber Artists (CQFA). In the afternoon nine of us did a "round robin" inspired by a chapter in Sherri Lynn Wood's new book:
We each began by selecting fabrics from our collection to set the color scheme, and made a quick pieced block from some of the fabric. A strict fifteen or twenty minute time limit kept us from overthinking the process.
Our baskets of fabric (all except one signature fabric) and the block we worked on were rotated to another person. We then added some pieced work using the fabric given to us plus our own signature fabric.
As the quilts progressed we were encouraged to see what the quilts had to say and "add to the conversation" with our own piecework. We were given a little more time with progressing rounds as larger pieces needed to be completed. Thirty minutes for the last round and to "complete the conversation".
There were no great masterpieces, but each quilt was attractive and unique, and we all had a sense of accomplishment in a relatively short time. It will be fun to add a bit more piecing to balance the design and enlarge it to the size I want.
Labels:
CQFA,
group project,
Improvisation,
work in progress
Friday, February 28, 2014
Going Bananas
This was a final project for my design class last semester. It’s purpose is to illustrate the word “cooperation”. The monkeys are cooperating to get bananas which are being guarded by an alligator. I want to add more quilting in the background, but I don’t know when I will find the time right now.
I am currently using it again in parts in a photo montage for my Photoshop class.
I have linked up to Nina Marie’s Off the Wall Friday.
I am currently using it again in parts in a photo montage for my Photoshop class.
I have linked up to Nina Marie’s Off the Wall Friday.
Sunday, January 26, 2014
A Bird from LeeAnna
A little bird came all the way from Maryland last week. LeeAnna Paylor made this little quilt for me in exchange for a set of my coffee cup coasters. He is hanging now over my sewing area and reminding me of my new blog friend and encouraging me to be creative.At the CQFA meeting a couple of weekends ago, we did a project together inspired by Susan Carlson’s technique of creating pictures from tiny scraps of fabric. My project is quickly taking a detour from the original concept and going it’s own way.
Transparen
t paint used to stencil across the fabric scraps ended up much darker than I had planned, so I added scraps of yellow organza over much of the paint to tone it down. I didn’t like how the black tulle I had was dulling the yellow down, so I am using a sheet of transparent water soluble stabilizer to hold everything together until it is quilted. Then it will probably get another layer of paint.Thursday, January 17, 2013
My Quilt Rescue Continues
- Attempt to fix color and contrast problems them with fabric markers and paint
- Fixed some problems but also created more problems because of my timid approach
- Procrastinated for several days while I decided to continue working on this project or abandon it all together
- Decided it’s better to risk ruining the whole thing than putting it back in the drawer for another several years
- Abandoned all caution, and attacked with paint in bolder colors
This still isn’t my favorite piece, but I am encouraged by the direction this is going. I will continue with it this week. I think I will add more color to the still black and white fabrics before I start quilting.
Thursday, January 10, 2013
A New Background for an Old Work in Progress
I’m trying to finish up some older things to make room for some new project ideas.
I have replaced most of the background fabrics in this piece which I started in 2006 and got out again last week. I am starting to like this piece up close, but I can see it needs some work with more contrast when I stand back from it. I need to decide if I will add paint or change some of the fabrics to make the composition more successful.
I have it up on my design wall now next to this piece, and noticed it had many similarities to this quilt I did in 2011. It seems I have a series going quite by accident.
Nina Marie has chosen the word Productivity for 2013. She has been finishing projects as well. Things I plan to do for 2013 so I can make Productivity my word also:
I saw a preview of “The Watercolor Show” as it was going up in at the Cinema Place Gallery in Hayward this week. It looks like it will be a fabulous show.
I have replaced most of the background fabrics in this piece which I started in 2006 and got out again last week. I am starting to like this piece up close, but I can see it needs some work with more contrast when I stand back from it. I need to decide if I will add paint or change some of the fabrics to make the composition more successful.I have it up on my design wall now next to this piece, and noticed it had many similarities to this quilt I did in 2011. It seems I have a series going quite by accident.
Nina Marie has chosen the word Productivity for 2013. She has been finishing projects as well. Things I plan to do for 2013 so I can make Productivity my word also:
- Finish this quilt (any ideas for a title?)
- Finish up the quilt made with “starter scraps” (began in November)
- Make Camilla a skirt (from fabric purchased several months ago)
- Make canvas shopping bags (got fabric last week)
- Complete several acrylic paintings for a class I am starting in a week and a half
- Get started with the new quilting ideas which are in my mind still
I saw a preview of “The Watercolor Show” as it was going up in at the Cinema Place Gallery in Hayward this week. It looks like it will be a fabulous show.
Friday, January 4, 2013
Two More Watercolors & Some Quilted Portraits
Three watercolor paintings I did earlier this year will be an exhibit at the Cinema Place Gallery in Hayward:
The Watercolor Show
Jan. 10- Feb. 23, 2013
Reception Fri., Jan. 11, 5-7pm
Here are a couple more watercolors I did for my class.The technique for the first painting was to emulate the texture that Andrew Wyeth used in his paintings. This lantern and the foreground rocks have texture added to them from stippled paint, sanding, and lots of drybrush. This is my husband’s favorite so far this year. I like how most of the painting turned out, but wish the water hadn’t gotten so muddy looking, and I’m not sure about the brown rocks.
The second painting we were to use Turner’s technique of picking paint up after putting it onto the paper to lighten areas. This is a view of Lake Chabot in Castro Valley from an overlooking trail on Fairmont Ridge.
I found a couple of unfinished quilted works I started seven years ago.
The face on the first is from two pieces of fabric. The face is drawn on with a Pigma ink pen. The shapes and lines are all traced from a photo of Camilla when she was about six years old, but somehow it didn’t end up looking like her very much at all. The part I like best is stalk of succulent flowers I added almost as an afterthought because the bottom seemed to plain, but they never quite seemed to fit with the rest of the image. This one is nearly done except the edges are unfinished. I expect it will stay this way unless I decide to cut it up and use the flowers from it on something else sometime.
Saturday, November 17, 2012
Watercolor Portrait Completed
When Camilla was two, we were vacationing in Colorado. This watercolor was done from a photo taken on that trip.
The technique for this assignment was glazing, meaning many layers of very watered down transparent layers laid one on top of another to build up the color. I like the results, but didn’t enjoy the process, so this will probably be the last painting I do entirely in glazing. I have used glazing in a limited amount in other paintings where I need to change or darken a color. It also worked nicely to get soft color changes in the face.
Here is a detail of the in progress quilt started last week.
Monday, November 12, 2012
Notan, Gallery Exhibits, & Scrap Starters
Last weekend at CQFA, we did a mini workshop on considering the Japanese concept of Notan in our designs. Here are my workshop results completed with free hand cut paper and glue.
I gallery sat at the Cinema Place Gallery in Hayward for their Abstract Exhibit. It is a nice selection of both two and three-dimensional work. There are three other quilters plus painters and sculptors in the exhibit. Chabot College also has an exhibit there this month. The work in the Chabot exhibit is mostly representational, and is an impressive display of drawings, paintings, and sculpture.
Wanting a small project I could do in between my current watercolors, I thought I would try completing a small quilt started with small scraps. I saw this idea on Franki Kohler’s blog. Franki was inspired by an article by Jenny Bowker in Machine Quilting Unlimited (May 2011.) Here is my start. The idea is to use the small scrap as in inspiration for the quilting design, and then to expand the design into the plain areas of the quilt with free-motion quilting. I am already thinking about how I might add paint to parts of the quilt.
I gallery sat at the Cinema Place Gallery in Hayward for their Abstract Exhibit. It is a nice selection of both two and three-dimensional work. There are three other quilters plus painters and sculptors in the exhibit. Chabot College also has an exhibit there this month. The work in the Chabot exhibit is mostly representational, and is an impressive display of drawings, paintings, and sculpture.
Wanting a small project I could do in between my current watercolors, I thought I would try completing a small quilt started with small scraps. I saw this idea on Franki Kohler’s blog. Franki was inspired by an article by Jenny Bowker in Machine Quilting Unlimited (May 2011.) Here is my start. The idea is to use the small scrap as in inspiration for the quilting design, and then to expand the design into the plain areas of the quilt with free-motion quilting. I am already thinking about how I might add paint to parts of the quilt.
Wednesday, October 17, 2012
Shadow Shapes
My instructor liked the second Echeveria painting that I brought to class last week. His only suggestion was to darken the lower right corner a little more to keep the eye from wandering off the bottom of the painting.
The first Echeveria turned into my gesso experiment. The experiment wasn’t very successful in its outcome, but now I know how watercolor will combine with gesso. It is difficult to get even washes or dark colors. It might be useful to add texture to part of a painting, especially in a collage. It doesn’t seem to be a good technique for covering large areas intended for watercolor.
I picked a photo I took of teapots a few years ago for the next watercolor assignment. I chose it for the shadows, because for this assignment we are supposed to paint the shadows first, and then lay the color of the objects on top of the shadow painting.
I thought I was done with the shadow painting, but looking at it now on the computer, I see several areas I need to make darker. I can also see now that the pots have changed shape somewhat from the original. Oh well, they still look like pots.
I’m a bit worried about getting muddy looking colors when I lay down the yellow on the front pot. I should do a test to see if I want to change its color before I paint it.
The first Echeveria turned into my gesso experiment. The experiment wasn’t very successful in its outcome, but now I know how watercolor will combine with gesso. It is difficult to get even washes or dark colors. It might be useful to add texture to part of a painting, especially in a collage. It doesn’t seem to be a good technique for covering large areas intended for watercolor.
I picked a photo I took of teapots a few years ago for the next watercolor assignment. I chose it for the shadows, because for this assignment we are supposed to paint the shadows first, and then lay the color of the objects on top of the shadow painting.
I thought I was done with the shadow painting, but looking at it now on the computer, I see several areas I need to make darker. I can also see now that the pots have changed shape somewhat from the original. Oh well, they still look like pots.
I’m a bit worried about getting muddy looking colors when I lay down the yellow on the front pot. I should do a test to see if I want to change its color before I paint it.
Wednesday, September 26, 2012
Echeveria Watercolor
My second succulent is complete. I fussed with the colors and values so much trying to get it just so. It turned out reasonably like the photo, but the finished painting seams overworked to me.
I admire watercolors with looser strokes and broad washes, and so I decided to try the same composition again.
I had trouble in the first painting with a large orange area that seemed out of place. I spent a fair amount of time trying to tone it down, and fit in other smaller orange tinted areas. So I started with yellow this time, so I could distribute it early on. The yellow seems a little prominent right now. I think it will become a little less noticeable after I go back in with darker pinks and purples.
I admire watercolors with looser strokes and broad washes, and so I decided to try the same composition again.
I had trouble in the first painting with a large orange area that seemed out of place. I spent a fair amount of time trying to tone it down, and fit in other smaller orange tinted areas. So I started with yellow this time, so I could distribute it early on. The yellow seems a little prominent right now. I think it will become a little less noticeable after I go back in with darker pinks and purples.
Saturday, September 8, 2012
Self Portrait Workshop
Caroline Ogg and Bron McInerney led a mini Self Portrait workshop at our CQFA meeting this morning. There was a lot of nice work this morning. I just took a few photos.
This is a sample Caroline did in a previous class. Can you tell she adores cats? I especially like her creative use of fabric for the eyes on her portrait.
Bron did a portrait of her friend. She traced the major shapes from a previously done watercolor, and used the tracing as templates to cut the fabric pieces. The necklace is bits of shell on a string.
Julie’s portrait is all in blues and greens. The fabric outlining her eyes is peacock feathers, and the white of her eyes are clouds.
I was afraid to start cutting directly into my fabric, so I spent the time sketching from a photo. My plan was to trace pattern pieces following the outline of the shaded area. It was good to get some drawing practice in, but I think I may start over by tracing over the actual photo to get a more accurate image.
This is a sample Caroline did in a previous class. Can you tell she adores cats? I especially like her creative use of fabric for the eyes on her portrait. 
Bron did a portrait of her friend. She traced the major shapes from a previously done watercolor, and used the tracing as templates to cut the fabric pieces. The necklace is bits of shell on a string.
Julie’s portrait is all in blues and greens. The fabric outlining her eyes is peacock feathers, and the white of her eyes are clouds.I was afraid to start cutting directly into my fabric, so I spent the time sketching from a photo. My plan was to trace pattern pieces following the outline of the shaded area. It was good to get some drawing practice in, but I think I may start over by tracing over the actual photo to get a more accurate image.
Thursday, August 16, 2012
Fitting the Quilted Work Around the Rock
The piece I created somehow wasn’t the same shape as my paper pattern when I was done stitching the edges. There was a lot of pleat adjusting and sewing in extra pieces.I’ve done all the machine work I can do on this. I will need to complete the stitching by hand. Then wrap it in a damp cloth and steam it well with an iron to help the quilted shell conform to the correct shape.
Monday, August 13, 2012
Stitching on Water Soluble Stabilizer
I went shopping a few days ago for Sulky Solvy, since it’s the only water soluble stabilizer I am familiar with.
I came home with Pellon Wash-N-Gone. It feels and looks like a medium weight non-woven interfacing, and less like a piece of plastic wrap. I thought that because it had a little more body I wouldn’t need a hoop to work with it. The quilted fabric is stiff enough to hold its shape, but the stabilizer is puckering badly. If I was trying to create an exactly sized piece, this would be a problem, The edges of these pieces don’t need to be exact, so I think it will work for me.
The hard part is going to be figuring out how this goes back on the rock after I have finished stitching and rinsing it. And I must remember to mark the leftover stabilizer well, so I don’t use it to interface a shirt collar sometime.
I came home with Pellon Wash-N-Gone. It feels and looks like a medium weight non-woven interfacing, and less like a piece of plastic wrap. I thought that because it had a little more body I wouldn’t need a hoop to work with it. The quilted fabric is stiff enough to hold its shape, but the stabilizer is puckering badly. If I was trying to create an exactly sized piece, this would be a problem, The edges of these pieces don’t need to be exact, so I think it will work for me.The hard part is going to be figuring out how this goes back on the rock after I have finished stitching and rinsing it. And I must remember to mark the leftover stabilizer well, so I don’t use it to interface a shirt collar sometime.
Saturday, August 11, 2012
Quilted Rocks
What do rocks have to do with textile art? Not much, except
it’s been in the back of my mind for a year or two that I should cover a rock
in quilted fabric. Having plenty of leftover rocks from our landscaping project
left me with no excuses.
I’m not exactly sure how this will all come together yet,
only a rough plan. I don’t intend to cover the rock completely, but will leave holes
so the rock can be seen. The edges of the quilted section will be finished with
free motion threadwork done on wash away stabilizer.
I had attempted to construct a pattern by covering the rock with
tissue paper and then again with masking tape, cutting it off with a knife,
then adding darts with scissors until it laid flat. This worked a bit. I think the
multitude of darts I had would just look messy and confusing.The tape was more
difficult to cut than I thought it would be, and the edges were a little jagged.
I will try again with a sheet of paper, scissors, and maybe some double sided
tape.
I picked a fabric color which would look nice against this
rocks dull yellow-gray color. Since the colors reminded me of sand and water, I
quilted a small piece of the cloth with motifs which made me think of water and
rocky shores and then painted it to add a little dimension and highlight the
texture. I kind of like this as is, but will continue with my plan to cut it up
once I figure out the shapes I need.
Out in the front yard, Doug has laid the edging board for a
brick walkway next to our very narrow driveway. Camilla and I leveled sand and
laid bricks the last couple of days. This will give us room to get out of the
car without stepping on plants or gravel, and provide a walkway to the backyard.
Thursday, July 5, 2012
Whisper Challenge
Have I really not posted since December? I was busy in Spring teaching an Excel class which I hadn't taught before. Went on a week and a half trip to Orlando and Disney World right after school let out. This summer I've been busy with a major garden project in the front yard. I did manage to get a quilt done last month, although I can't show more than a preview since it's a challenge project which can't be revealed yet.
It’s Whisper Challenge time again. Here is a small detail of
how I began. The top is pieced together with overlapping edges held together
with zigzag stitching. I drew the main design lines directly on the top with a
permanent fabric marker. They are hardly visible now after I have added all of
the layers of paint and quilting. The completed quilt won’t be revealed until after
the challenge is complete in February 2013.
The 2011Whisper Challenge can now be viewed on the SAQA regional blog. My quilt “Figs
for a Crow” is the seventh quilt in Group 5.
Here is the photo, which I started from. A small crab on a rocky beach.
Here it is my finished quilt. I zoomed in on the little
crab, brightened the color scheme up, and added a few barnacles.
I love what Deb Cashatt
came up with next. She manipulated the photo of my quilt in Photoshop, and came
up with something totally unique.
Labels:
finished quilt,
whisper challenge,
work in progress
Subscribe to:
Posts (Atom)